RPSign can be used to request and receive digital signatures for documents when requesting quotes from clients. This is a built-in feature of RentalPoint3, so no third party application is needed.
 Alternatively, RentalPoint can also be configured to integrate with DocuSign (a subscription to DocuSign is required)
Using RPSign in RentalPoint3
Producing your Document
Once RentalPoint3 is configured to use RPSign, use any template that already has the RPSign field included OR add the necessary fields to your custom templates before proceeding
For standard templates (i.e. included with RentalPoint3), display your Fast Report with 'Print RPSign Rental Terms' Checked
Save your quote


Then use the  option to request an electronic signature
Email addresses associated with the booking will display. Choose an email address to send your document to, then click 

next, choose a signature and enter or select your email body paragraph
- If you haven't already set up email signatures or body paragraphs, see how under General information at this link
- Enlarge the body paragraph by dragging the window from point 2 below

then click 
You may be required to enter your email password before sending OR force the prompt using
 checkbox on the lower left of the window.


What your customer will see
 Ensure your customer has added your email address to their contacts list in order to prevent your electronic signature request going to their Spam folder.
The client will see an email from your email address with an attached PDF.
A clickable link in the signature box, will prompt for an electronic signature

Insert signature text, format as needed, accept terms and proposal
Once accepted, the signee will see a 'Document signed' confirmation in the top right corner of the page and the operator who sent the quote will receive a notification email.
Signed Documentation Attached to the Booking
Once the document has been signed, the sending operator will receive and email notification


Highlight the booking, then click on View Attachments

OR from right click menu

Click on any document link to see signage details
Review All E-Signature Documents
See all e-signature documents under the Action Lists menu option
Fig 1.1
1. Use the  option to filter between RPSign and DocuSign documents. You can also exclude documents saved but not emailed out for signature 'not sent' and/or documents sent out for e-signature that were not signed 'declined' documents.

2. Access other menu options via  including opening the DocuSign envelope to review directly in your DocuSign account.

3. Use the Search option on the far right of the window to search for a particular booking (fig 1.1 above)
4. Open/Print booking details
5. Identifies the type of e-signature requested i.e. DocuSign or RPSign
Configure RentalPoint3 RPSign Integration
 RPSign works by assigning a URL to the document and pasting it into the PDF document sent to clients. By clicking on the URL, the customer can review and sign the document.
The following APP Settings are required in c:/inetpub/wwwroot/RP3RentalPoint3/web.config file - contact support@rentp.com for assistance with this step as needed.
Define RPSign URL
</appSettings>
<add key="RPSignURL" value="https://<Your Server DNS>/RP3/Sign/Index/" />
</appSettings>
Define Email Subject
By default, the email subject for all documents sent out for signature will be 'Signature Request'. If you would like to change the subject, use the terminology below in web.config
</appSettings>
<add key="defaultEmailSubject" value="Electronic Signature Request" />
</appSettings>
Email Settings
- Gmail (using a public or private domain account hosted by Google)
- You'll need to set up both a Project and Gmail API (for desktop app) in your Google Account.
- Then create OAuth credentials
 and download the json file
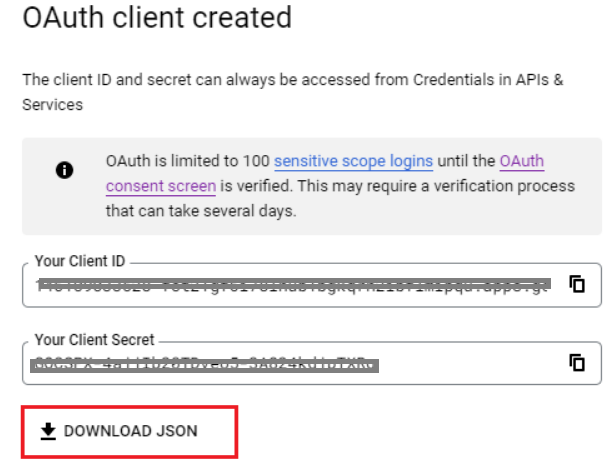
- Rename the file to 'credentials' and contact support@rentp.com to complete your gmail setup.
- The email used in Location (via setup-->Locations) or Company (via Setup-->Parameters) SMTP settings must match the account used to set up the Gmail API and the account used to configure email in RentalPoint3

- Office365
- You'll need to configure a connector to send mail using Microsoft 365 or Office 365 SMTP relay
- Once configured, goto Setup-->Operators in RentalPoint2 and configure as follows using the connector address in SMTP Address below
- No password is needed when using a connector, so when prompted for a password just leave it blank

- Configure email settings in web.config file

- If 'Document Signed' notification emails go to your Spam or Junk folder, you'll need to register the static IP of your RentalPoint3 server in your Microsoft 365 admin center. Contact support@rentp.com for your Static IP

 and download the json file


RentalPoint3 Fast Report Templates
In RentalPoint3, customedesigner.exe is used to edit your '.fr3' report templates. The electronic signature field should be available on standard quotes using the 'Print RPSign Rental Terms' option OR contact support@rentp.com to add the fields to your custom templates.
The text or picture field added must have the name RpSign
