Pick equipment for a booking using the RentalPoint Warehouse Prep mobile app OR from the RentalPoint Desktop menu. Real time updates allow multiple users to pick from the same list of equipment simultaneously!
- Picked assets are considered still in the warehouse (possibly a staging area) and set aside for a particular booking - waiting for checkout
- Checked out assets are considered 'out' of the warehouse - in use on the booking they are checked out on.
 Scan options available for RentalPoint3 include keyboard wedge, bluetooth and in device camera for barcode or QR Code scanning
Mobile User AccessClick the | Desktop User AccessFrom the Bookings Control Panel, highlight the booking to pick equipment for, then choose the Pick option from the Work Menu
|
 icon on the dashboard.
Equipment Scope
The Scope area provides options to determine the range of equipment on the booking to pick.
Where available click the  to the right of headings for more information on the title
 Pack a road case or rack with booking items
 Unpack a road case or rack
 View items already picked for this booking
Before picking, click/unclick the options below to narrow your scope as needed, then expand the SCOPE option

Scope can be narrowed to a single booking or expanded per options below. By default the highlighted booking is selected in the search box. Click  to keep this option or
  to search for other bookings
Enter a portion of the field you want to search for (show name, company, booking # or contact)

Select the booking and click the  checkmark to accept.
Once selected use the  option to view the equipment list.
The Pick List Screen
The pick list displays equipment within the scope selected by the user.
 | Move between bookings within the scope |  | Access more menu options (unpack road case/rack/ Booking info/Asset Status etc.) |
 | Identifies the number of short items for the product |  | Show/Hide Messages (errors & warnings window) |
 | Pack a road case or a rack |  | Modify range of items to view in the pick window |
 | Scan floating items in a rack |  | Refresh |
 | Remove scanned items |  | Save |
 | Advance to next item in the list |  | Roadcase |
 | Show the assets that are reserved |  | Toggle comments on/off in equipment list |
Sample 1:
Sample 2:
Sample 3:
Headings now display in Pick Window
Modify Grid View
The number of items visible in the grid can be narrowed down by selecting one of the options

Matching Products – Show all lines with a product matching the currently selected line
To Do – Only display lines that still need to be picked
Asset Tracked - Show Assets (items with a unique barcode) to be picked only
Non-Tracked - Show only items that are NOT tracked with a unique barcode
Shortages - Show only items that are short
Additional - Show only items that have been scanned that are NOT on the booking (i.e. items added at checkout)
Cross rental/Sub hire – Only display lines that are assigned to a cross rental PO
Transfers – Only display lines that are assigned to a transfer
Q.T./D.A.T. – Only display lines that will be resolved by a quick turnaround or direct transfer from another booking
Barcode Items
1. Click on an item in the list, then scan the barcode to pick that item
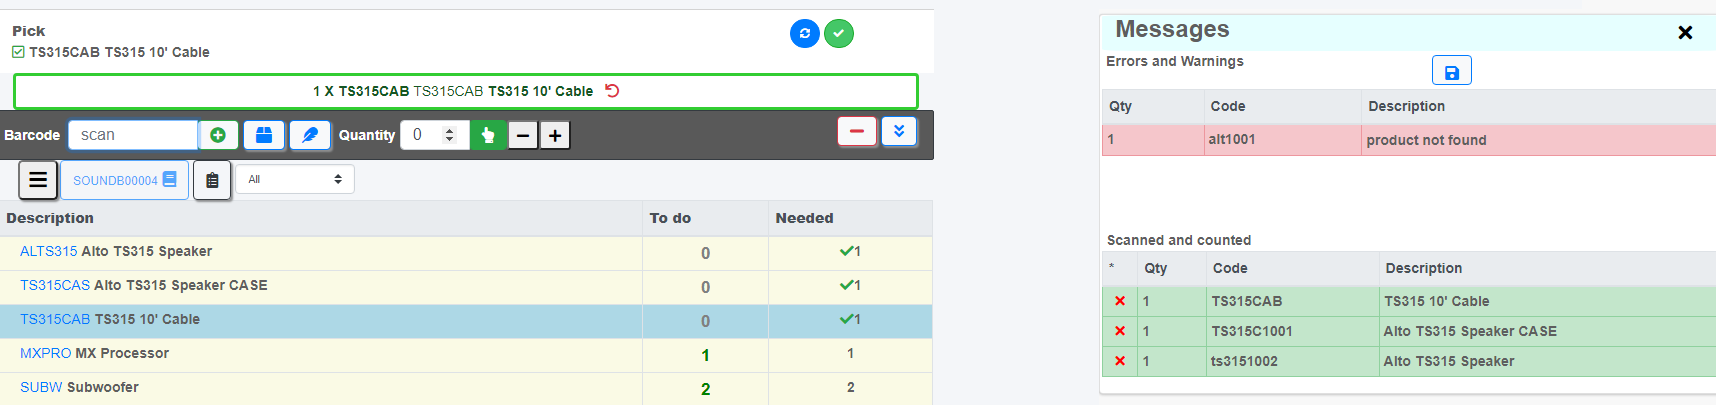
- Errors will show up red on the Message Board (warnings will show in yellow)

- Successful scans will show up green on the Message Board.
- A check mark will show under the 'Needed Column' for that item in the list while the 'To do' qty will be decremented
- Items picked for other bookings will not be available for picking


Non Barcoded Items
Non Barcode Tracked items can be scanned using the non tracked barcode from Product Setup
OR using the  on-screen option. The quantity defaults to the number of that item needed.
Simply click  to pick that quantity
Before Pick
After Pick

Reserved Assets
The  icon on any line identifies reserved assets for that item click the icon to display a list of reserved assets and their pick status.


Undo Pick
Undo the last item picked using the  icon to the right of the picked item

To undo a pick from the current list, click the  remove icon

Then scan the barcode to remove OR  to cancel the operation

Alternatively, open the Message Board and click the X to the left of any scanned item
Below, the  shows that an extra asset has been scanned. Simply click the
  to remove/undo the scan for that item

To undo a previously saved pick, pull up a list of previously picked items
Then click the x to the left of the item to remove and confirm

The Message Board
Errors and warnings show up colour coded as follows
WARNING

SUCCESS

ERROR

Access the Message Board using the  icon to the right of the Booking Number at the top of the screen. This is a toggle icon, so you can click the icon a second time to remove the board.
Use the  icon to save errors to a file and clear the 'on screen' error list. Files are saved to the hpdata_dir\Error Lists using the booking number (hp_data is defined during setup in your web.config file)
Use the X to the left of any item to remove the pick for that item

List Information
Extra information may appear beside the item description as below:
 Item is assigned to a cross rental/sub hire
 Line is short by number indicated
 Item unit weight
 Bin location of Item
 Item is direct transferred from specified booking
 Quick turnaround coming from the specified booking
 Item is in a rack
 Item is being transferred from another warehouse location
Multiple Bookings
When there is more than one booking in the equipment scope selected by the user - i.e. if a user selected a project or delivery date 
Move between the Bookings within the scope by clicking the current booking. This will show a list of other bookings available for picking. Select any booking in the list to load the equipment list for that booking based on the initial scope.

Additional Equipment
Items that are not on the original booking equipment list, when scanned, will either show an error message indicating they cannot be picked, or a warning showing they will be added as an extra item. This is controlled by Barcoding parameter #10 “Can add non-components”

Extra items picked will appear with a plus icon in the qty column, indicating that they are not listed on the original equipment list for the booking

NOTE: While picked for the booking, additional items scanned at the pick stage do NOT add items to the actual booking at this point.
Picked items will be added to the booking at time of checkout.
Pick a Road Case/Rack
Road cases/ racks are picked in the same way as other equipment. Simply scan the barcode of the road case/rack item. 
All items registered in RentalPoint as currently packed in the rack/road case will be picked when the rack/road case is picked. 
Unpacked Racks/Cases can be packed from the Pick window using the  icon
icon

The packed case is picked once saved using the  icon. Again all items in the case are picked when the case is picked
Similarly, removing the case from the 'Picked' items, will remove all packed items too
NOTE: To Pack/Unpack road cases or racks without picking them, use the icons on the SCOPE or Racks and Road Caes Window.
Items unpacked from a rack/road case will be 'unpicked' from the booking too.
Refresh the Pick List
At certain points when scanning equipment, the pick list will be updated to reflect changes made by other users.
Operators can manually refresh the list by clicking the  refresh icon at the top of the page. The refreshed display will reflect 'picks' made by other operators.
An exclamation point will appear beside the line where a new pick was added by another user.

Additional Options
Accessible via the  icon, view booking/product/asset/pick information and/or unpack a road case

Batch Scan
Open the 'Batch Scan' option to scan multiple items without moving through the pick list
Then scan or copy/paste your barcodes into the scan window and click 

All items will be scanned to the booking, with errors and warnings registered where applicable

Substitutions
Substitutions of equipment can be made within the pick list window. The original line will be hidden from the pick list but will still be included on the invoice. The new item will be visible to the warehouse but will not affect the price.
Operators must have the “Resolve Discrepancy” Operator privilege in order to see the substitutions option in the Pick window
To make a substitution, first, select an item to replace in the list, then click 

The action bar will be replaced with the yellow substitute bar (see screenshot below):
- Select the quantity on the line that should be replaced
- Enter the product:
- either by pressing
 to select from a list of alternatives
 - or by pressing
 and scanning the barcode of the item to be selected.
- either by pressing
- Select the alternative item from the list (when selecting from a list of alternatives the current availability of each item appears beside the description)
- Click to
 commit or
  to cancel the selection
 to select from a list of alternatives
  and scanning the barcode of the item to be selected.
 commit or
  to cancel the selection
Once the substitute item has been selected, click  to save or
  to cancel the substitution

Below the Product has been substituted but still needs to be scanned. The substituted product is identified with a  icon to the left of the product
Here's how the substitution shows in the booking
Session List
Previously picked items can be displayed by clicking on the menu button  and selecting from the available options. These options include current & previous session lists for all operators.


- Click
 to remove picked items from the list
 - Items that will be added to the booking on checkout are identified with a
 to the left of the Qty field
 - Items packed into a road case/rack are identified with a
 icon to the left of the product description. Removing the road case/rack product here will remove all the packed items with it but the items will remain packed in the case. To remove a single item, open the road case/rack in the pack window.
 - Use the
 to go back to the Pick menu
 to remove picked items from the list
  to the left of the Qty field
  icon to the left of the product description. Removing the road case/rack product here will remove all the packed items with it but the items will remain packed in the case. To remove a single item, open the road case/rack in the pack window.
  to go back to the Pick menu
Check Out Prep Session
Warehouse prep sessions can be loaded into the checkout window in RentalPoint Desktop so that items don’t need to be re-scanned before loading.

In the Checkout window click on the Prep Sessions tab.
Exceptions:
- Barcode Parameter #45 Use Warehouse Prep must be ON for the 'Prep Sessions' tab to display.
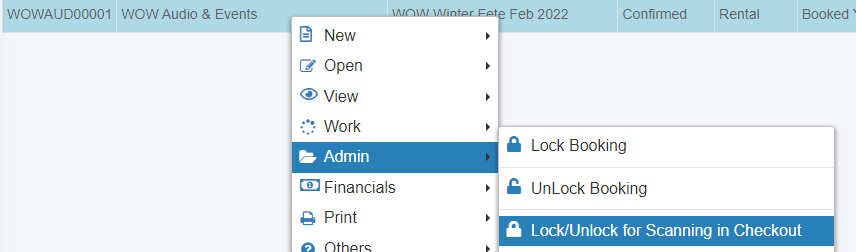
- Bookings Locked for Checkout will not show the 'Prep Session' tab,
- Unlock the booking to proceed (Operator privileges apply)
- Unlock the booking to proceed (Operator privileges apply)

Select the session to check out, then click 

All the assets, non-tracked items and cross rented/sub hired equipment in the prep session will be loaded. Any errors found in the session will be listed in the Errors and warnings window.
The operator should then click the save button to complete the checkout. 
View Warehouse Sessions
Access from the top menu
Or the right click menu
- Uncheck 'include history' to see only items that are currently in the status of that status on the booking


- See both Picked and Checked out information under the 'All' tab
- Use the sort arrows beside each field header to change the sort order
