First highlight the booking on the booking grid, then access the 'Print' option from the right click menu 
OR from the top menu bar
Click on the name of the template you would like to use and wait for the merge to complete
Once the document is merged, both Word and PDF versions of the document are automatically attached to the booking. You will also see a 'Document has downloaded' message.
Sometimes users like to add some manual formatting to their merged document before sending it on to a client. To do this, check your downloads folder for the merged document and alter as needed.

To replace an attached document with a modified version, keep the filename the same, click NEXT and follow the onscreen instructions (screenshots below). If no modifications are needed, click CLOSE.
You can attach any document to the booking at any time from the 'View Attachments' window. If you attach a file that has the same name as an existing attachment, the file will be replaced.


Invoicing can be customized with via Invoicing Parameters.
First highlight the booking on the booking grid, then access the 'Print' option from the right click menu

OR from the top menu bar

Click on the name of the template you would like to use and wait for the merge to complete

Once the document is merged and an invoice number assigned, you will see a 'Document has downloaded' message. Both a Word and a PDF version of the document have also been attached to the booking.

Sometimes users like to add some manual formatting to their merged document before sending it on to a client. To do this, check your downloads folder for the merged document and alter as needed.

To replace an attached document with a modified version, keep the filename the same, click NEXT and follow the onscreen instructions (screenshots below). If no modifications are needed, click CLOSE.
You can attach any document to the booking at any time from the 'View Attachments' window. If you attach a file that has the same name as an existing attachment, the file will be replaced.


Once the documents have been uploaded click the green checkmark  to exit.
When documents are produced for a booking, they are automatically attached for later reference. To view documents attached to a booking OR to attach new documents, first highlight the booking on the booking grid
Then right click on the booking to access the view menu 
Or access from the top menu

Click the arrow to the left of the yellow folder you would like to expand
From here you can:
 | Download an attached document |
 | Remove link to attachment (the file will not be deleted) |
 | Email an attached document |
 | Attach any document (to replace an existing attachment, use the same filename. The existing attachment will be overwritten) |

Operational Parameter 84 sets your company preference for document merge using either Fast Reports exclusively or a combination of Rich Text Format (RTF) quote and invoice templates along with Fast Report templates for all other options.


If you make changes here, remember to reload software settings to operate under the new settings.

Include the RentalPointInsertFieldsModule.dll file in your Word Startup folder in order to access all insert fields available from RentalPoint while setting up your template. Contact support@rentp.com to request your copy of the file. Click here for a list of <insert fields available>.
Once installed you'll see the RentalPoint insert fields under your Word 'add-ins' tab.
To Install the RentalPointInsertFieldsModule.dll file
Find the location of your Word Startup Folder
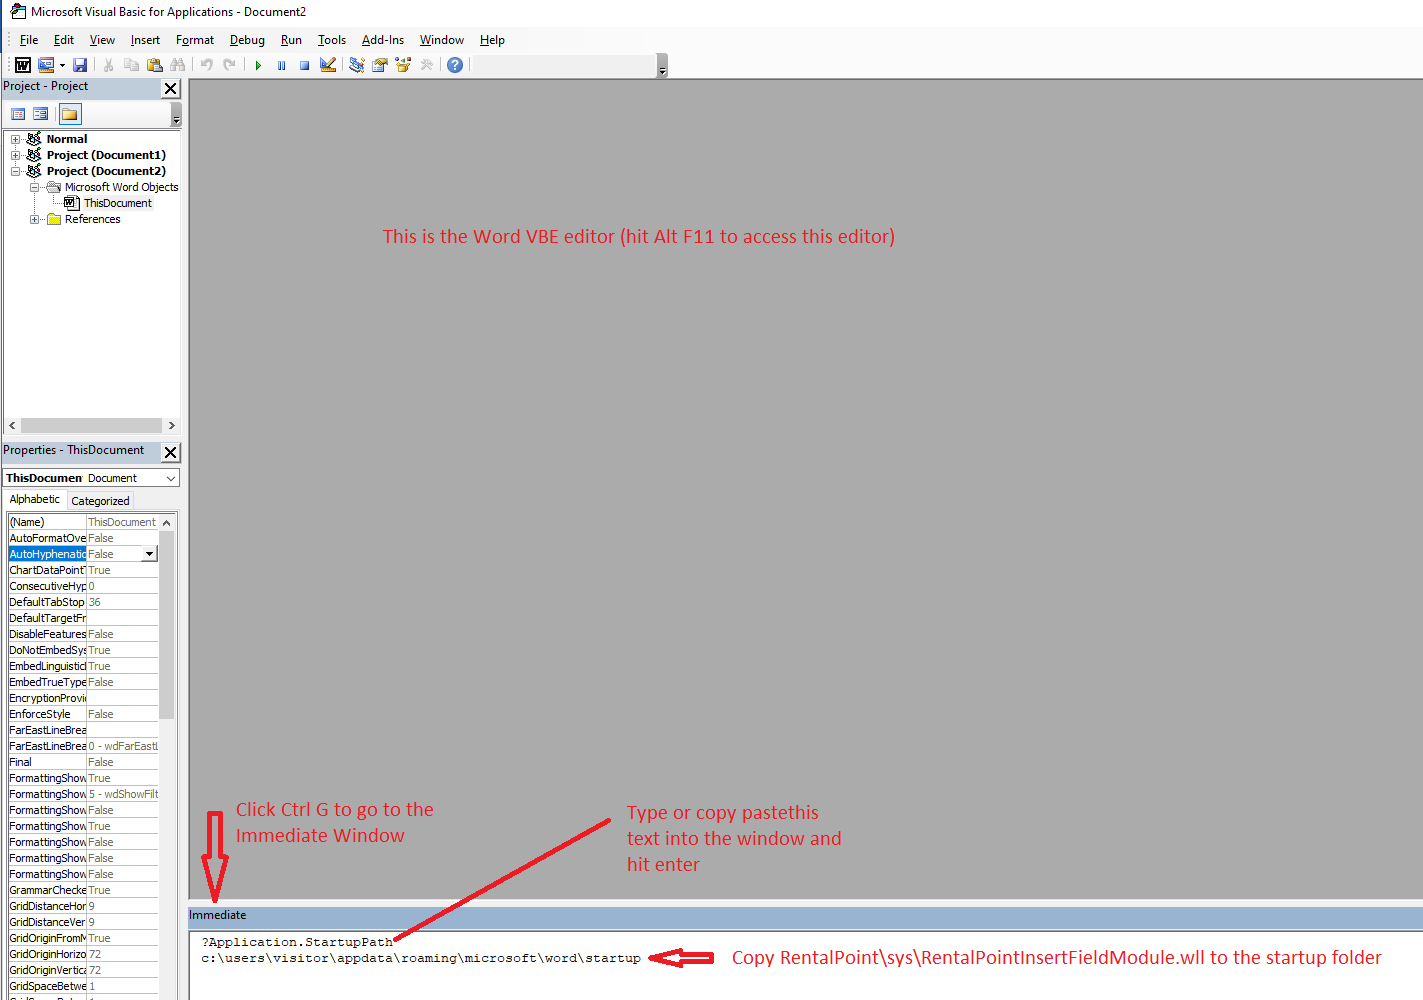
- Open Word, then press Alt+F11 to open the macro editor, VBE.
- In the VBE window, press Ctrl+G to go to the Immediate window.
- In the Immediate window, type: ?Application.StartupPath
- Press Enter.
The path to the STARTUP folder is now shown below the line you typed as illustrated in Figure 1 below. You can copy the path and paste it into the address field in Windows Explorer and press Enter to go directly to the STARTUP folder.

Copy c:\RentalPointv11\sys\RentalPointInsertFieldModule.wll to the startup folder
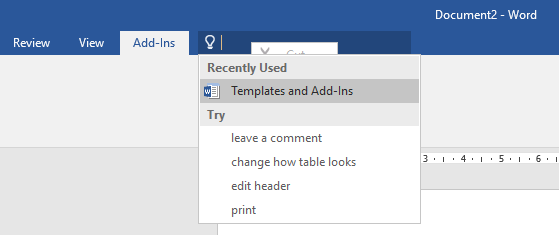
Close Word and reopen, if the Add-Ins tab doesn't show up or if the RentalPoint Add-Ins are not there, follow the steps below.
Type 'Templates and Add-Ins' into the search bar

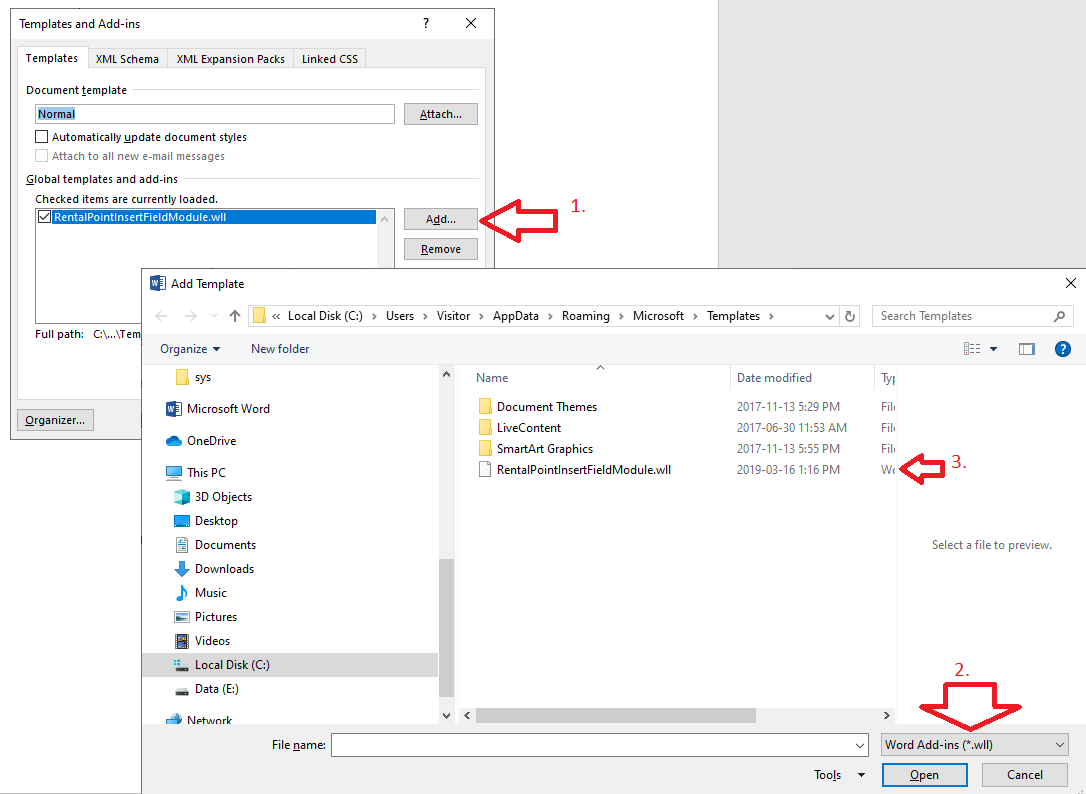
Click ADD to find and add the RentalPoint Add-Ins

You should now see the RentalPoint Add-Ins tab

RTF Insert fields are used to merge data from your RentalPoint Database with your MS Word template. Fields are available via the RentalPointInsertFieldModules.dll file or see our list of RTF Insert fields.
Colour Insert Fields
| INSERT FIELD | DESCRIPTION |
| &COMCOL& | Comment colour |
| &HEDCOL& | Heading colour |
| &SUNCOL& | Sundry colour |
| &COMPCOL& | Component colour |
| &GROCOL& | Group heading colour |
To use any of the colour insert fields:
- Insert one or more of the colour insert fields into your template above the equipment list.
- Then highlight the text between the &'s and change the colour
- The comments will appear in the colour of the insert field

Output Document with colour
Custom printing parameter #4 enables heading sub totals to print on custom documents.
Please contact support@rentp.com to enable this functionality for your company setup.
Open Microsoft Word and design your template as desired OR copy an existing template (see load document below for where to find existing templates)
For any area where you would like information from the booking to print, use the corresponding insert field from the RenalPoint Add-ins Tab, colour insert fields and regular insert fields

Save your document as an RTF type

Load your document for use in the software


Edit the settings to set whether the template should be available from the Print->Quote or Print->Invoice option


We've outlined some typical formatting issues found when modifying or creating new templates.
Please contact support@rentp.com should your template issues persist beyond the resolutions below.
Insert Fields Display in Merged Document
For any insert fields that do not merge (i.e. the insert field is showing in the merged document)
- Sometimes Word stores junk characters around insert fields in RTF documents preventing the field from merging properly. To resolve, copy the insert field into a notepad, then copy it back to your template.
Equipment List is not Aligned Properly
See equipment list outlined below
When saving your RTF template, use File-->Save AS instead of the save icon.
This ensures the file is saved without garbage characters between insert fields which can cause issues during the merge process.
If the equipment list prints in a dis-proportional font:
- Use a Fixed Width/Monospaced Font for the equipment list in your template like Consolas
- If you're already using a Fixed Width/Monospaced font then please send a copy of your font file to support@rentp.com so that we may load it and make it available for your template.
- Sometimes MS Word stores junk characters between the fields on the equipment list. For this reason all editing of the equipment list should be performed in Notepad.
- Cut the equipment list line out of the template into a notepad
- Then add any spacing needed where the equipment list should appear in the template
- change the font for the spaces to Consolas or another fixed size font (avoid using Courier new)
- Move the equipment list outside of a table.
- If the template still doesn't work:
- Edit the template using notepad++
- Find the equipment list and look just before it for /fnn where nn is the number for the font.
- Delete the /fnn and all the ones that appear before it.
Remove any & characters used as normal text in your template
- Since the software uses '&' as part of the code to merge database information to your template, please refrain from using '&' as normal text. Delete any & from the template that is NOT part of an insert field
If the template still doesn’t work - email the template to support@rentp.com for review


