First, Select Booking(s)/Project to Return
Screenshot 1.1
User must have operator privileges to Return Bookings and/or Open/Project Return. See Operator Privileges heading for more information
By default the Booking scan window will be activated, simply scan/enter your booking code to continue OR click on the same field in the Open Return / Return Project window
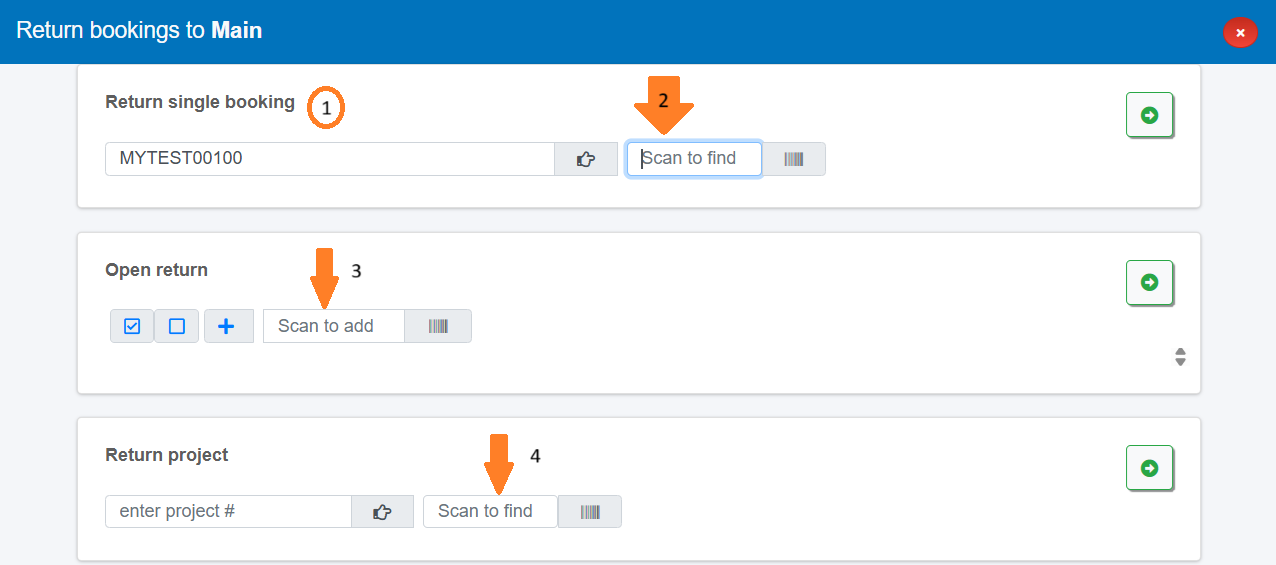
Reference screenshot 1.1 above. The Scope area provides options to select booking(s) or project to return.
1. The location at the top of the screen is where the items will be returned.
2. Enter the booking number to return a single booking
3. OR Use Open Return to return gear to many bookings in the one return session. The open return list displays a list of booking that are due for return in the next few days. Check the box next to any booking to include it in the return list. Don't worry if you miss a booking. Once an 'out asset' is scanned, RentalPoint will find the booking the asset is out on and add it to the list.
 Select all bookings in the list
 Unselect all bookings in the list
 Add a booking to the list
Once bookings are selected, click  to proceed
4. OR Use the Return Project option to return gear to bookings in a project. Simply enter the project code and click to  proceed.

All 'Out' bookings associated with the project will be loaded and available for return. Then follow 'Return Items' instructions outlined in the next section.
Then, Return Items
Assets
Make sure the cursor is in the scan box and then start scanning equipment.
If the return was successful a green success message will display and the item will be added to the top of the list.

Assets can also be returned by serial # or description via serial number or product search options access as outlined below.

Non Tracked Gear
From the scan window, open the equipment list for the booking you are returning

Move between bookings as needed to find the gear you are returning,
then click to begin returning non tracked gear

If Barcode parameter #11 is enabled, the qty in the 'Return' columns will automatically equal the qty in the 'Out' columns.
If Barcoding parameter #12 is enabled, use the select/clear options  to complete the return figures in bulk,
Alternatively, manually enter figures in the 'Return' column against each item
Once quantities have been entered, click  to submit OR
  to quit without applying the quantities.


 identifies the item as assigned to a subrental
Rack/Road Case Items
Scan the rack/road case barcode to return the item and its packed contents. The items returned with the rack/road case will appear below the scanned item.

Next, Final Return Bookings as Needed
Final Return any booking to change the status of the booking from 'Out' to 'Returned'. A Final Return can be processed at a later date if some items are still awaiting return.
From the scan window, access the bookings Item List using the  icon
icon
Once all items for the booking have been returned, click the  button to complete the return.

A message will be displayed on completion

and the booking will show as 'complete' in the item list

Finally Complete/Print the Return Session
When all assets have been scanned click the green check  at the top right corner of the window to complete the session and free up locked bookings for other users.
Click the printer button next to each booking to print collection dockets and / or return receipts.
 Save and attach error lists to bookings by checking the box before exiting

Documents available to print for each booking
When all documents have been completed click the green check  again to exit the return session.
